28.9.13

Almond Joy + Samoa Cookies + Millionaire's Shortbread = Coconut Almond Chocolate Layer Bars

OH. MY. GOSH.
I just made the best treat I have ever eaten. It's samoa cookies meets almond joy meets millionaire's shortbread. And the best thing? It's HEALTHY. I repeat, HEALTHY. Not low calorie, not light, but made with no refined sugars and only wholesome, real food ingredients. And you wouldn't know the difference.

I promise. One bite and you'll be sold. I wish words could do these bars justice. But they really just can't. I don't know what more to tell you. THESE ARE THE BEST THINGS EVER. Dessert, tea time, breakfast, snack, please just eat them anytime. They are gooey, fudgy, crunchy, chocolately, lip-smacking and out-of-this-world scrumptious.

Have you ever felt speechless? Well, that's the way I feel about these bars. Sometimes a picture is worth a thousand words, so I'll leave you to it.

If you haven't got the gist yet, MAKE THESE BARS. NOW. They are absolutely crazy delicious.

Ingredients
For the "crust":
2 cups almond meal
1/2 cup desiccated coconut
1/2 cup baby oats
3 tbsp coconut oil
4 tbsp honey
1/4 tsp salt

For the middle layer:
1 1/2 cup dates, pitted and soaked in warm water
1 cup desiccated coconut
1/2 cup coconut milk

For the chocolate topping:
3/4 cup semi-sweet chocolate chips
1/2 cup chopped dark chocolate
1/4 cup milk

Instructions
Preheat oven to 175 C.
Brush an 8"x 8" square baking pan with some coconut oil.
Throw the baby oats in a food processor and give them a quick pulse. Add in the rest of the crust ingredients: coconut oil, desiccated coconut, honey, salt and almond meal and process until a moist crumble dough forms. Press this mixture into the base of the baking pan. Bake for 12 minutes until the top of the crust has become a light golden brown.

Meanwhile, make the middle layer. Drain the dates. Add the dates and coconut milk into a food processor and process until an almost smooth puree forms. Mix in the desiccated coconut. Once the crust is cooled slightly, spread this mixture evenly across the crust and place in fridge to cool.

Melt the chocolate chips, dark chocolate and milk in a double boiler until silky smooth. Remove pan out of fridge and pour the chocolate mixture on top. Even it out and place back in the fridge for an hour until the chocolate has set.

Cut into squares and store in the fridge.

ENJOY! This deserves more than an enjoy so, devour!

P.S. Don't forget to like the Strawberry Chocolate Concoction Facebook Page for tips, recipes and updates: https://www.facebook.com/StrawberryChocolateConcoction!

25.9.13

Pumpkin Muffins with Vanilla Glaze (Doughnut Muffins!)

So, it officially has started looking like fall here in London. The leaves are starting to turn red, brown, orange and yellow. The weather is definitely getting colder. And supermarkets and farmer's markets are piled high with apples, pears and pumpkins.

I have never ever baked with pumpkin before. I haven't even tasted pumpkin pie. Don't kill me yet. I took this opportunity to make scrumptious pumpkin doughnut muffins (the vanilla glaze makes them doughnut-y). Pumpkin combined with cinnamon and nutmeg - it just screams fall!

I made my own pumpkin puree from fresh pumpkins following this method. I highly highly highly recommend doing the same because the flavor is so much richer, it's more fresh and there are no sketchy additives! 

Unlike most other recipes, the glaze here is a must. It adds that tad bit of crunch, sweetness and most of all, gives them the doughnut feel.

Fall, muffins, pumpkin, faux-doughnut. What are you waiting for?

Ingredients
For 9 large muffins
For the muffins:
1 1/2 cup self-raising flour
1/2 cup baby/quick-cooking oats
1 tsp cinnamon
1/2 tsp nutmeg
1/4 tsp baking soda
 4 tbsp greek yogurt
1 cup homemade pumpkin puree
1/2 cup + 2 tbsp light brown sugar
1 large egg
1 tsp vanilla extract

For the glaze:
1 cup icing sugar
2 tbsp milk
1/2 tsp vanilla extract

Instructions
Preheat oven to 195 C.
Prepare a muffin tin with 9 muffin liners and set aside.
In a medium bowl, whisk together flour, oats, cinnamon, nutmeg and baking soda.
In another mixing bowl, beat brown sugar and egg until thick and pale. Add in the vanilla extract, pumpkin puree and greek yogurt. Beat again.
With a spoon, mix the dry ingredients into the wet until just combined.
Divide the batter evenly among the 9 lined muffin cups. Fill each fully.
Bake 20 minutes until a toothpick inserted in a center comes out clean.
While the muffins are cooling, make the glaze. Sift the icing sugar into a bowl and mix in the milk and vanilla extract.
When muffins are almost cool, dip and swirl tops of muffins into the glaze and let the glaze run off the sides. Place in a plate or on a wiring rack till muffins come to room temperature and glaze has hardened.
As always, enjoy!


22.9.13

Vanilla Pear Muffins

Last Sunday at the farmers market, I picked up a bag of delicious, juicy, organic pears - I mean, it is fall after all! Some of them I inhaled straight out of the fruit bowl while the others decided they wanted to start ripening quicker than I could eat them, so the baking mindset took over and I made these wonderful, light vanilla pear muffins.

The combination of vanilla, pear and nutmeg pair so beautifully together, you'll wonder why you never thought of it before.

So before I meander off, just remember that then end point of this post is to tell you to go make these muffins.

Anyways, I am leaving for Cambridge in just over a week. I need to start packing, getting my things together, finish a pending math review packet and be mentally prepared to leave my family for all of two months. Not a lot. At all. I know. But I love them to the end of the world. Knowing they're less than two hours away from me (Cambridge to London) means so much; I couldn't wish for anything more.


Ingredients
1 cup all-purpose flour
1/2 cup baby/quick-cooking oats
1/4 tsp salt
1 1/2 tsp baking powder
2 large eggs
1 1/2 tsp vanilla extract
1 tbsp orange zest
1 cup light brown sugar
1 cup unsweetened applesauce
4 small ripe pears, thinly sliced
granulated sugar, for sprinkling

Instructions
Preheat oven to 200 C.
Line a muffin tin with muffin cases and set aside.
In a medium mixing bowl, whisk together the flour, baking powder, oats, nutmeg and salt.
In another larger bowl, beat together eggs, vanilla, orange zest, brown sugar and applesauce until well combined.
Mix the dry ingredients into the wet until just combined; do not over mix.
Fold in half of the pair slices.
Distribute the muffin batter evenly.
Stick 3-4 thin pear slices into the top of the muffins. Sprinkle granulated sugar onto the muffins.
Bake for 30 minutes, or until muffin tops have slightly crisped and browned.
Serve warm or at room temperature.
Enjoy!

20.9.13

Homemade Cinnamon Toast Crunch!

I. Made. My. Own. Cereal.

And not just any cereal - cinnamon toast crunch! It has more cinnamon, more sugar, and all round more goodness that storebought. I promise you'll never turn back after you make it once. You get to see exactly what's going in to your stomach as well as add as much cinnamon and sugar as you wish (obviously more!).

The whole wheat flour adds a real nuttiness and texture that you will definitely enjoy. What's more is that the recipe uses coconut oil, which has been making it's mark in the health and food world in a big way lately.

Before you shy away, it's easier than you may think! Just make the dough (in a food processor!), roll it out, sprinkle with cinnamon sugar, cut it into squares, poke some holes and bake away! Within moments, the waft of cinnamon sugar goodness will spread throughout your home.

It's delicious with milk right out of the fridge (the milk's gotta be cold!) or straight out of the box as an any-time-of-day snack.

Better and healthier than the storebought version, this cinnamon toast crunch is undoubtedly worth a try!

Ingredients
Makes around 5 cups of cereal
1 1/4 cups whole wheat flour
1 1/4 cups all-purpose flour
2 tsp baking soda
2 tsp cinnamon
1/3 cup + 2 tbsp coconut oil, melted and divided
1/3 to 1/2 cup brown sugar
1/2 cup buttermilk
1 tsp vanilla
2 tbsp honey
1/4 cup granulated sugar
1 tsp cinnamon

Instructions
Line two baking sheets with parchment paper.
In a food processor, add the whole wheat flour, flour, baking soda and 2 tsp cinnamon. Pulse to combine.
Add in 1/3 cup coconut oil, brown sugar, vanilla and honey. Pulse again until dough resembles small crumbly pea size balls.
Add in the buttermilk and process until a dough forms. The dough might seem a bit dry, but fear not - it's fine.
Preheat the oven to 175 C.
Divide the dough into two flat discs.
Dump one of the disks onto a lightly floured counter and roll the dough as thin as possible, ideally 1/8 of an inch thick. Brush 1 tbsp of coconut oil on top.
Combine the 1 tsp cinnamon and granulated sugar and generously sprinkle half of the mixture on.
With a sharp knife, slice into 1/2 inch squares. Pierce each square 2 to 3 times withe a fork. Using your hands or a thin spatula, carefully place the squares on the prepared baking sheets.
Repeat with the remaining dough.
Bake for 10 to 15 minutes until light golden brown on top. After 10 minutes watch carefully: it can go from beautiful golden brown to burnt very quickly.
Allow to cool completely and store in an airtight container.
Serve with milk, yogurt, fruit or straight out of the box.
Enjoy!

18.9.13

Coconut Lemon Bundt Cake

A week ago, I had gone to Whole Foods with my mom (I could live in Whole Foods!) and had picked up some dessicated coconut with the intent of using it in my baking adventures. And so I did. 

Lemon and coconut meld so well together. Such a tropical blend. They sound like such sharp, strong flavors but truly just add a subtle hue to a delicious bundt cake. The edges crust up perfectly and the middle stays spongy and moist. Perfect texure. Perfect.

The coconut milk and eggs lend the majority of the wet ingredients in the batter and no added fat is required. If you're ever skeptical about the lack of butter or oil affecting taste, please don't be! Just give one recipe a chance and you'll realize that you honestly won't miss the butter or oil. Ever. Ok not exactly. Most of the time is more accurate. Most often, you can replaced the butter/oil with mashed banana or applesauce. Anyways, I'm getting side tracked here.

This bundt cake (it can really be made in anything: loaf pan, muffins, round cake but I was in the mood for a bundt!) is exceptional at teatime and makes a great quick breakfast. Neither of the flavors overpower and I wish I could explain in words just how well they blend together!

Ingredients
2 cups self raising flour
1 cup unsweetened coconut milk, stirred well
3 eggs
1 3/4 cup light brown sugar
1 lemon, zest and juice
1 tsp vanilla extract
3/4 cup dessicated coconut

Optional Glaze
lemon juice
icing sugar

Instructions
Preheat the oven to 175 C.
Lightly brush a bundt pan with butter and set aside.
Zest the lemon and rub/mix the zest into the brown sugar.
In a large mixing bowl, beat together the lemon-infused sugar and eggs until pale and frothy.
Beat in vanilla.
With the mixer on low, beat in the flour, followed by the lemon juice and coconut milk.
Finally, fold in the dessicated coconut.
Pour batter into prepared pan.
Bake for 60 minutes or until a toothpick or thin knife inserted in the center comes out clean.
For the glaze, just mix together sifted icing sugar and lemon juice until desired consistency. For best results (obviously not the healthiest), make a thinner glaze the first time and pour it all over the bundt and let it soak in. Once all the syrup has been soaked in, make the glaze again but much thicket this time. Pour it neatly over the bundt and let it drip over the edges. The glaze should harden and form a nice layer.
Enjoy!

17.9.13

No-Bake Marble Cheesecake

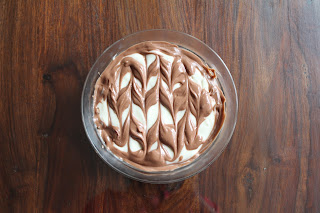
So, as I mentioned in my last post, I told you I had something planned for my wonderful mom's birthday! Behold this stunning no-bake marble nutella swirl cheesecake topped with luscious raspberries:

If you don't think it's gorgeous... then... I really don't know what to say! I almost didn't want to cut into it and eat it, but WOW am I glad I did. It was absolutely, utterly, lip-smackingly delicious. The perfect swirl/feathering effect is so easy and looks amazing. The raspberries are unnecessary, but juicy fruit and a burst of color never hurt!

Let me just explain how good this is. My mom, sister and I (my dad took a bite, but is a die hard dark chocolate and ice-cream fan only!) single-handedly finished this within thirty minutes. I repeat: thirty minutes. I'm not sure whether to be proud of this feat or not - but I'll go with yes!

This wasn't my original idea. I planned to make a red velvet cake with cream cheese frosting for my mom, but that failed as I couldn't get myself to add the several tablespoons of red food coloring to the recipe [it's very different eating red velvet and seeing for yourself how much artificial coloring goes in - maybe it's just me...] Anyways, I immediately thought of this! I mean, I had just purchased a tub of cream cheese. At the time, I expected it to be an okay-ish dessert that would compensate for the lack of a second (red velvet) cake. I couldn't have been more wrong.

When I made the cheesecake-type filling, I didn't add any whipped cream or anything and was worried that the texture would be gummy and stringy as opposed to rich and delish. Yet again, I was proved wrong.

Feel free to make this in an individual sized portion for a quick dessert fix, leave out the marble swirl and keep it a single flavor or customize it with any fruit jam and with any toppings that you so desire. Just believe me, it's simple, quick, effortless and outright delectable.

Disclaimer: this does NOT fit into the category of mostly healthy recipes!

Ingredients
150 g cream cheese, softened
2-3 cups icing sugar, sifted
4 tbsp nutella
6 tbsp whole milk
1 tsp vanilla extract
13 oreo cookies
1 tbsp butter, melted

Instructions
Crush the oreo cookies and mix in the melted butter. Pour into a 9" round glass dish and press down.
Whip the cream cheese, icing sugar and vanilla extract together. Add the milk tablespoon by tablespoon until desired consistency is reached. Spoon two thirds of this mixture on top of the oreo cookies and make an even layer.
Beat in the nutella into the remaining one third of the mixture. Spoon the chocolate-y mixture into 5 horizontal strips on top of the plain cheesecake layer.
Take a knife or toothpick and carefully pull through the cheesecake vertically, starting at the very left. Leave 1" gaps and pull through in the opposite direction until this pattern has been achieved throughout the cheesecake.
Top with fruit, marshmallows, more cookies, melted chocolate, whipped cream, sprinkles, the options are endless.
Cover with cling wrap and place in the refrigerator for 2 hours or until firm.
Spoon the creamy, cold, sweet cheesecake into your mouth. You deserve it.
Enjoy!

15.9.13

It's Birthday Season: Chocolate Peanut Butter Layer Cake!

Aaaannndd, it's birthday time of year again! Obviously, this is the best time of year because it means lots and lots of good food and even more delicious dessert. See here for last year's celebration and cake! Pre-note: this has nothing healthy about it. Life is about a balance and birthdays call for decadence. Before you read further, don't forget to like the Strawberry Chocolate Concoction Facebook Page for tips, recipes and updates: https://www.facebook.com/StrawberryChocolateConcoction!

Once again, I (needless to say) made a cake for both my parents' birthdays, which fall on the 11th and 12th of September. I won't re-explain this whole thing, but check out last year's post if you're interested! This year I went about creating a not 3-(last year) but 4-layer cake! It is filled with a smooth peanut butter buttercream frosting and topped with a light, but chocolate-y buttercream frosting. We always end up cutting the cake on my dad's birthday (11th), because, seriously, who can wait one more day for cake? Anyways, you'd be glad to know that it was absolutely delicious; I'm so happy that both my parents loved it (as well as my sister, but she's my biggest fan anyways!).

On a side note, I also cooked dinner for them. I made a super-duper pasta dish with alfredo sauce (no cream or butter!), mushrooms and spinach with a skewer of chilli/lime/herb marinated shrimp on the side. I can safely say that the shrimp marinade was fabulous and the alfredo sauce was probably one of the best "creamy" sauces I have ever eaten... and once again - NO butter or cream!

Back to the cake. The cake itself is dark and rich, but not overpowering. I threw in some chocolate chips in the batter just for kicks! The peanut butter frosting is to. die. for. Not cloying, not too heavy, not too sweet, it adds the perfect filling to this delicious chocolate cake. And the chocolate frosting is literally the cherry on top (not to be cliche or anything). I decorated the bottom of the cake by lining it with white chocolate stars and outlined a start shape on the top of the cake, as you can see.

We put in five blue candles, sang happy birthday to my dad as he blew them out and devoured the cake! If you're wondering what happens to my mom, as you might (rightly) think that she felt disregarded, just wait for my next post! [Now here.]

The perfect celebration cake, the chocolate cake recipe itself is a keeper and can be used in any occasion. Fill it with your favorite frosting, ganache, serve it with ice cream or fruit or simply dust it with powdered sugar. But let me assure you, the peanut butter frosting is something you don't want to miss. I could eat it with anything and everything - apples, crackers, pretzels, cookies... a spoon...

Ingredients
Makes a 2-, 3- or 4-layer 9" round cake depending on the thickness of the layers
For the cake:
1 1/4 cups sugar
1 3/4 cup flour
3/4 cup + 2 tbsp unsweetened cocoa
2 tsp baking soda
1 tsp baking powder
1 tsp salt
3 eggs
1 cup buttermilk
1 cup strong black coffee
2/3 cup coconut oil
2 tsp vanilla extract
1/2 cup chocolate chips (optional)

For the peanut butter frosting:
1/2 cup butter, softened
1/2 cup peanut butter
2 cups icing sugar
1 tsp vanilla
5-6 tbsp whole milk

For the chocolate buttercream:
1/2 cup butter
1/3 cup cocoa
1 1/2 cup icing sugar
1 tsp vanilla
5 tbsp whole milk

Instructions
For the cake:
Heat the oven to 175 C. Line two 9-inch round baking pans with baking paper. Set aside.
In a large mixing bowl, combine the sugar, flour, cocoa, salt, baking soda and baking powder.
Add eggs, buttermilk, coffee, oil and vanilla. Beat until ingredients are well combined.
Stir in the chocolate chips.
Pour batter into prepared pans.
Bake for 40 minutes or until a toothpick inserted in the center comes out clean.

For the peanut butter frosting:
Whip the butter until creamy and white-ish. Beat in the peanut butter. Sift in the icing sugar, add the vanilla and beat again. Add the milk tablespoon by tablespoon until the frosting reaches the desired consistency.

For the chocolate buttercream:
Whip the butter until creamy and white-ish. Sift in the icing sugar and cocoa poswer, add the vanilla and beat again. Add the milk tablespoon by tablespoon until the buttercream reaches the desired consistency. [Add more or less cocoa and/or sugar depending on your preferred taste].

To assemble:
Split the 2 cakes in half horizontally to make 4 layers (I refrigerated first to make it easier to cut). Get a serving plate and line the outer edges with baking paper to ensure a clean plate after frosting. Place one layer on the plate and smother in peanut butter frosting. Lay the next layer on top and repeat thrice. The last time, place the fourth layer on top and then cover the whole cake in a crumb coating of the chocolate buttercream. Place in the fridge for 30 minutes. Spread the rest of the chocolate buttercream all over the cake and decorate as desired. It's best served at room temperature but delicious anyhow, anyway, at any point in the day. Pure bliss. Enjoy!

12.9.13

Peach Almond Upside-Down Cake

Just another one of my daily kitchen adventure creations. Perfectly ripe summer peaches topped with a batter that is just sweet enough to complement the juicy peaches. Use up that summer fruit and make an upside down cake for breakfast or tea time!

Most of the sweetness in this recipe comes from the peaches themselves, which lend a wonderful flavor and make you feel like you're holding on to the last bits of summer - here in London, we need that feeling!

I've always wanted to make an upside-down cake (honestly, I wanted my first one to be pineapple, but I couldn't resist when I saw the peaches in my fruit bowl) and I'm so glad I did. My dad even sent me a text from work telling me how much he enjoyed the cake! Hopefully that convinces you further to try out this recipe. You could technically switch out the peaches with any stone fruit of your liking, for that matter.

Ingredients
3 tbsp unsalted butter, divided
4 tbsp natural applesauce
1 cup + 3 tbsp sugar, divided
4 medium firm but ripe peaches, peeled and sliced
1 1/2 cups flour
1/2 cup almond meal
2 tsp baking powder
1/2 tsp salt
2 large eggs
1 tsp vanilla extract
1/2 tsp almond extract
3/4 cup whole milk

Instructions
Preheat oven to 175 C.
Butter a 9" round cake pan. Unfortunately, baking paper won't cut it here, so use a pastry brush and lightly coat the pan in butter.
In a small pan, melt one tablespoon of butter, 3 tablespoons of butter and 1 tablespoon of water. Cook for about 5-7 minutes, until thicker and golden brown. Pour mixture into base of cake pan and tip to distribute evenly.
Cut peaches into slices/wedges and arranged closely on top of the caramel-y mixture in cake pan.
Beat the 2 tablespoons of butter, 1 cup of sugar and 4 tablespoons of applesauces until thoroughly mixed and light. Add in eggs, one at a time, beating after each addition. Mix in the vanilla and almond extracts.
Whisk together the flour, almond meal, baking powder and salt.
While mixer is running, alternatively add in the dry mixture and milk into the butter/sugar/applesauce mixture, until batter is smooth.
Pour and smooth batter over peach slices in pan.
Bake for 45 minutes, until firm in center. Check that a toothpick comes out clean at this point. The very end might be gooey because the peaches will obviously be wet. Remove and let cool.
Invert on a platter and cut into large slices.
Embrace the goodness and enjoy! 

10.9.13

Chocolate Chip Banana Zucchini Muffins

And it's just about time for yet another one of my "summer" baking adventures! Yes, summer is technically over, especially here in London. I now need to wear a sweatshirt even AFTER I am done at the gym... which is not cool. I should be hot and sweaty!

I am so happy with the way this photo
turned out! It is so aesthetically pleasing...
Or at least I think so. 
Moving on, this is the perfect recipe to use any leftover ingredients - whether it be a ripe banana, those summer zucchinis, greek yogurt that's about to reach its best before date, or one of the several dozen eggs you bought from the farmer's market recently. Some of these may or may not apply to me...!

This recipe is quick, delicious, healthy... Cocoa is healthy - I promise! It's perfect for breakfast or anytime of day really, because the chocolate isn't overpowering (but I'm not sure I'd mind if it was!) They're light and summer-y. Feel free to swap out the zucchini with carrot if you so wish and the chocolate chips with any nut or dried fruit, depending on your taste. Zucchini and chocolate chips just happened to work best for me!

Ingredients
3/4 cup flour
1 1/4 tsp baking powder
3/4 cup quick cooking baby oats
1/2 tsp baking soda
1 1/2 tsp cinnamon
1 medium ripe banana, mashed
1 tsp melted coconut oil
1/3 cup honey
2 tbsp sugar
1 tsp vanilla
1 egg
1 cup shredded zucchini (about 1 medium zucchini)
2 tbsp natural applesauce
1/4 cup nonfat plain greek yogurt
1/2 cup chocolate chips

Instructions
Preheat oven to 180 C. Line a muffin pan with 9 cupcake liners and set aside.
Squeeze the shredded zucchini of excess water with a paper towel.
In a medium bowl, combine flour, oats, baking powder, baking soda and cinnamon.
In a larger bowl, beat banana, oil, honey, sugar, vanilla and egg. Keep mixing until smooth. Add in zucchini, applesauce and yogurt and mix well.
Slowly mix in the dry ingredients until just combined. [Do you want moist muffins? Then don't overmix!]
Gently stir in the chocolate chips. Evenly divide batter into muffin cups. Bake for 30 minutes or until a toothpick inserted into the middle of a muffin comes out clean.
Enjoy!

9.9.13

Orange Almond Cake

Stop whatever you are doing and head to your kitchen right now. Don't even bother reading the rest of this post. Just skip down to the ingredients and instructions and get baking. 

I lied in my last post when I told you that if you were only going to be baking one thing, bake the lemon blueberry yogurt loaf. I was wrong. So wrong. This is the cake to make. I'm am very serious. This is no light-hearted matter. Trust me. This cake will blow your mind when you least expect it. It is out-of-this-world amazing and a cinch to make! The hardest step is boiling oranges...


This cake was gone within two days of baking and requests have already been made for more. You'll look at it, smell it and expect a great orange flavored cake. You'll take one bite and your life will change. Forever. You will be in gastronomical heaven. 

This is not a "healthy" recipe but there's nothing unhealthy either. The almonds have all the fat needed for this cake to be beautiful and there's no added butter or oil.

Apart from the birthday cake I made for my parents last year (it's birthday time again!), this is my favorite baked creation. Just seven ingredients, a few simple steps and fifty minutes of baking time till this cake touches your lips. Behold the best orange almond cake in the universe. Make. It. NOW.

Ingredients
2 whole juicing oranges
4 medium-sized eggs
1 cup unrefined sugar
3 cups almond meal/almond flour/finely ground almonds
1 tsp baking powder
1 tsp vanilla extract
1/2 tsp almond extract 

Instructions
Wash the oranges well, place them in a large saucepan and cover with water. Boil the oranges and water for an hour and a half and drain. Let the oranges cool. Note: I did this step the day before and put the oranges in the fridge overnight.
Preheat the oven to 170 C. Line a 9" round baking pan with baking paper and set aside.
Chop the oranges into large chunks, having cut off the top bit and discarding all seeds beforehand.
Place the oranges in a food processor or blender and process until smooth (skin and everything).
Beat the eggs and sugar until thick and pale. Mix in the almond and vanilla extracts. Add the orange puree, almond meal, baking powder and fold until just combined. Pour into the baking pan and bake for about 50 minutes or until a toothpick inserted comes out clean. Let it cool.
Cut into [large] slices and dust with powdered sugar (if you so please for the extra indulgence).
Note: I think this tastes better the next day so I suggest you leave it in the fridge overnight and let it come to room temperature before serving. 

8.9.13

Lemon Blueberry Yogurt Loaf

And onwards. This is yet another one of my (almost!) daily baking adventures. As I get more and more familiar with healthy substitutions, I can make my treats healthier as well as yummier - what could get better?

This lemon yogurt blueberry loaf has no traces of extra added butter or oil, and I promise you won't miss it! The original recipe calls for a loaf, a lemon syrup and a glaze on top of that. I completely did without the syrup (once again: you won't need it!) and only added the glaze before serving at home. My dad and sister took it with them as a snack with no syrup and glaze and absolutely loved it, so if you wan't to keep it completely healthy and reduce the sugar intake, you won't be missing out! That's not to say the glaze doesn't add an extra delicious punch, but it's not necessary whatsoever.

Out of the many things I have been making, this has such a fresh and light summer feel with the lemon and blueberry and tastes outrightly amazing. If you're looking to make something and don't want to put in too much effort or think this may be one of the only things you'll make, GO AHEAD AND MAKE IT! You won't regret it.

[On a side note, apologies that several of my recent posts only have a picture of the end result. Honestly, it's because I've been baking spontaneously and by the time I start of in the kitchen, I completely forget about photo taking and can only do that once my nutritious and lip-smacking baked good is out of the oven.]

Ingredients
For the loaf:
1 1/2 cups + 1 tbsp flour, divided
2 tsp baking powder
1/2 tsp salt
3/4 cup yogurt
1 cup sugar
3 medium eggs
2 tsp grated lemon zest
1/2 tsp vanilla extract
1/2 cup unsweetened natural applesauce
1 tbsp freshly squeezed lemon juice
1 cup fresh blueberries, rinsed well

For the glaze (optional but highly recommended!):
1/2 cup icing sugar
2 tbsp freshly squeezed lemon juice

Instructions
Preheat the oven to 175 C. Line a loaf baking pan with greaseproof baking paper and set aside.
In a medium bowl, sift together the flour, baking powder and salt.
In a larger bowl, whisk together the yogurt, sugar, eggs, lemon zest, vanilla, lemon juice and apple sauce. Slowly mix the dry ingredients into the wet ingredients.
In a separate bowl, carefully toss the blueberries with the remaining tablespoon of flour, and fold them gently into the batter.
Pour the batter into the prepared pan and bake an hour, or until a toothpick inserted in the center of the loaf comes out clean.
Once out of the oven, let the loaf cool and cut into thick slices.

To make the glaze, sift the icing sugar in a small bowl and slowly mix in the lemon juice until desired consistency is reached. Pour over the cake slices.

Pucker your lips, taste summer in a loaf and don't forget to enjoy!

3.9.13

Smoothie Week!

Hi there! For the early bit of this week and all of last week, I have been having a blast making fresh fruit smoothies for breakfast for my mom and myself. My goal was to create a smoothie a day in rainbow order and I think I succeeded for the most part other than blue (because that's really tough!). The colors worked out great, but boy, the smoothies were even better. I always froze some fruit to get that delicious, luscious creamy texture as well as that icy cold feel. To make the smoothie the next morning, I then blended the frozen fruit with some fresh fruit, a sweetener of some sort (honey, agave, sugar, dates) and milk or yogurt. They were D. E. L. I. C. I. O. U. S. Refreshing, healthy and the best summertime breakfast or snack, smoothies are the way to go.

When life gives you fruit, make smoothies!
Yes. That's me. Yes. I did color coordinate my shirts. Yes. I had fun with this. Yes. Summer time, best time. Yes. I love fruits. Now... go make yourself a smoothie!
Comment below for any of the specifics on any of the smoothies.